Getting started with TimeSorter is quick and easy, but proper setup ensures you get the most out of your automatic time tracking experience. This guide will walk you through everything you need to know to set up TimeSorter for optimal productivity tracking on your Windows computer.
📋 System Requirements
- Operating System: Windows 10 or Windows 11
- Storage: 50 MB available space
- Memory: Minimal RAM usage (runs in background)
- Internet: Only required for initial download from Microsoft Store
Step 1: Download and Install TimeSorter
1Open Microsoft Store
Click on the Microsoft Store icon in your taskbar or search for "Microsoft Store" in the Start menu.
2Search for TimeSorter
In the Microsoft Store, use the search bar to look for "TimeSorter" or visit our direct link: TimeSorter on Microsoft Store
3Install TimeSorter
Click the "Get" or "Install" button. The installation process is automatic and typically takes less than a minute.
TimeSorter available on Microsoft Store
Step 2: First Launch and Initial Setup
4Launch TimeSorter
After installation, you can launch TimeSorter from:
- Start menu → TimeSorter
- Desktop shortcut (if created)
- Microsoft Store "Launch" button
5Welcome Screen
On first launch, TimeSorter will automatically:
- Create and initialize the local database
- Set up default categories and subcategories
- Configure basic detection rules
- Begin automatic time tracking immediately
Step 3: Configure Your Preferences
Access Settings
Click on the "Settings" option in the left navigation menu to customize your TimeSorter experience.
6Set Your Day Start Time
Configure when your workday begins (default: 6:00 AM). This affects how daily summaries and reports are calculated.
- Go to Settings → Time Configuration
- Adjust "Day start time" to match your schedule
- This helps align reports with your actual work patterns
7Choose Your Theme
Select your preferred appearance:
- Default: Follows your Windows system theme
- Light: Always use light theme
- Dark: Always use dark theme
8Configure Startup Options
Decide if you want TimeSorter to start automatically with Windows:
- Enable "Run with Windows" for continuous tracking
- Disable if you prefer manual startup
- This ensures you don't miss any productivity data
Step 4: Understanding Your Dashboard
Once TimeSorter is running, you'll see the main Dashboard:
Navigation Panel
The left sidebar provides easy access to all TimeSorter features:
- Dashboard: Overview of recent activity and quick stats
- Period Summary: Detailed analytics and time breakdowns
- Time History: Complete chronological list of all sessions
- Time Categories: Manage categories, subcategories, and detection rules
- Settings: Configure preferences and application behavior
Dashboard Overview
The main Dashboard area displays:
- Recent Activity List: Your most recent application sessions with timestamps
- Time Distribution Chart: Visual breakdown showing total duration by category with relative percentages
- Category/Subcategory Switch: Toggle control to view data by categories or subcategories
- Current App Session: Real-time details including start time, current duration, process name, app title, and assigned category/subcategory
- Quick Actions: Right-click context menus for creating rules and managing sessions
Key Dashboard Features
From the Dashboard, you can:
- Monitor Real-time Activity: See your current and recent computer usage
- Create Detection Rules: Right-click any session to set up automatic categorization
- Navigate to Analytics: Use the sidebar to access detailed reports and summaries
- Manage Categories: Quickly access category management tools
- Configure Settings: Adjust preferences and application behavior
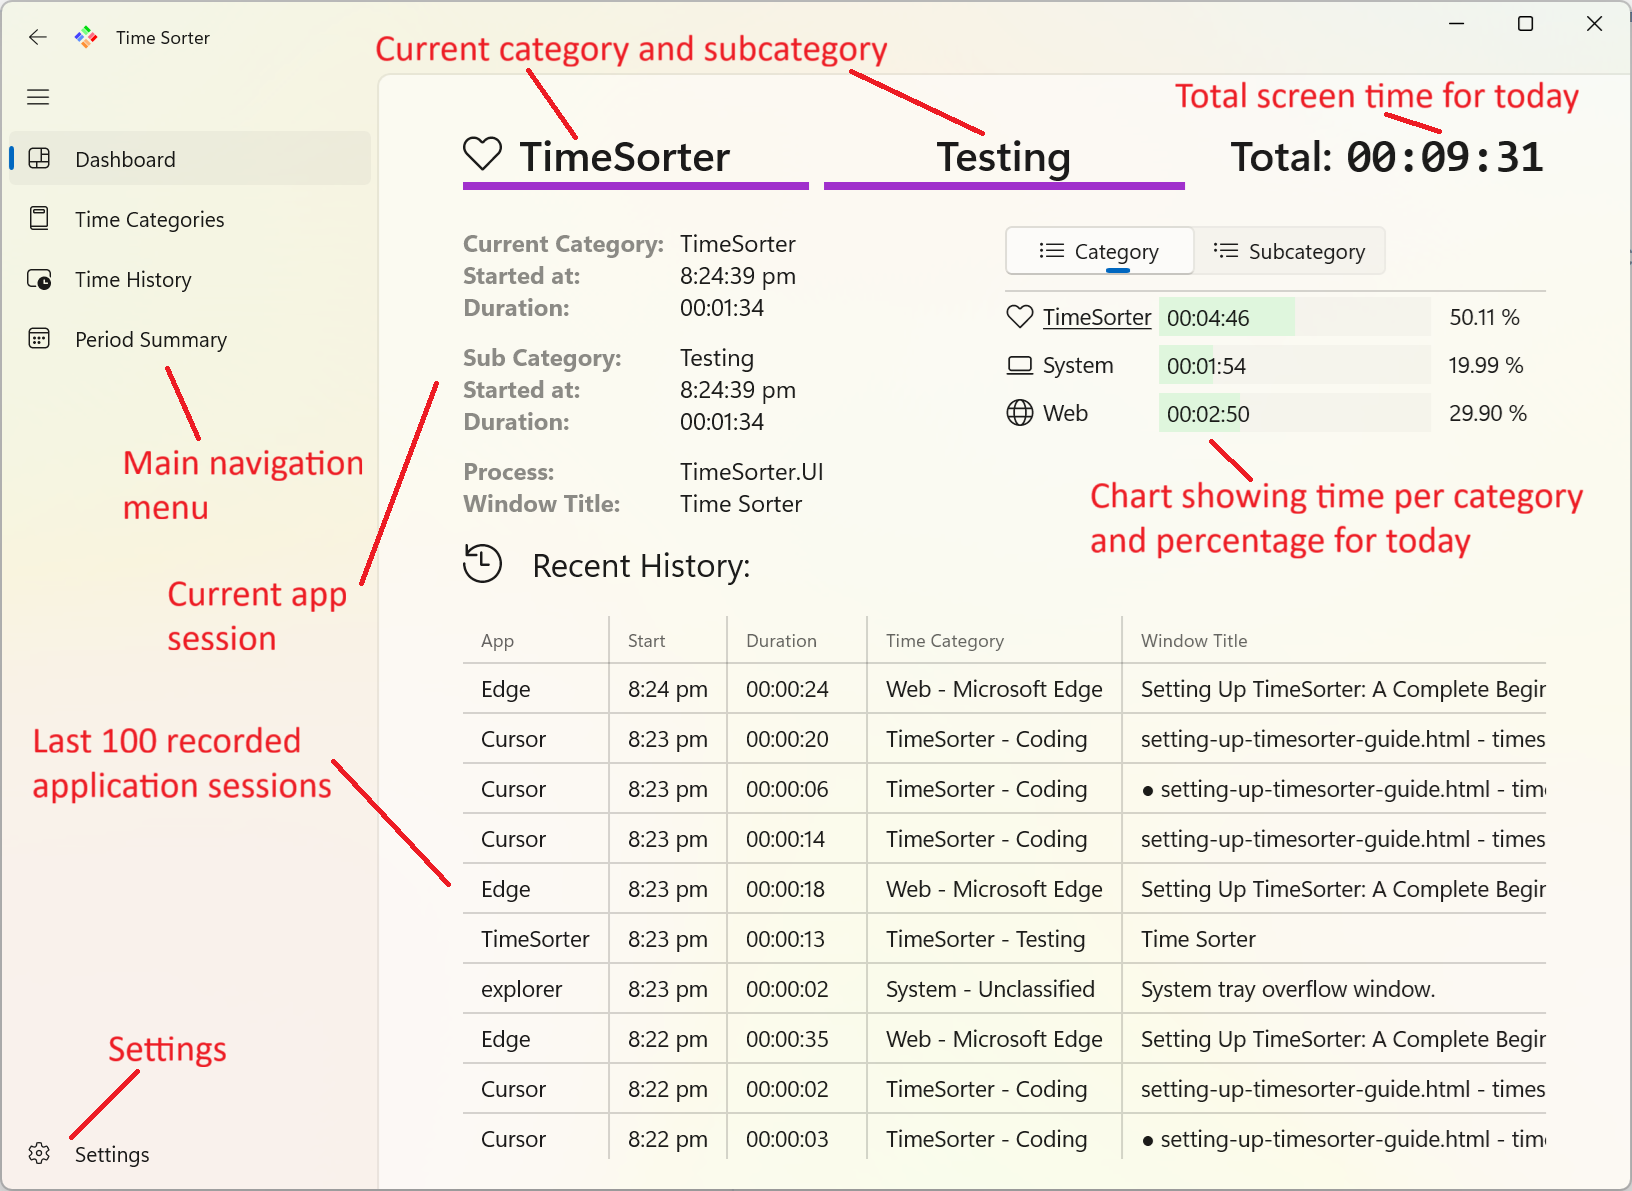
TimeSorter Dashboard with recent activity overview
Step 5: Customizing Categories and Rules
Understanding the Category System
TimeSorter uses a hierarchical category system:
- Categories: Main productivity areas (e.g. Work, Personal, Entertainment)
- Subcategories: Specific activities within each category
- Detection Rules: Automatic categorization based on applications and window titles
9Review Default Categories
Navigate to "Time Categories" to see the pre-configured categories:
- Work-related applications and websites
- Personal productivity tools
- Entertainment and social media
- Games, Web, etc.
10Create Custom Categories
Add categories that match your specific workflow:
- Click "Add Category" to create new categories
- Choose colors and icons for easy identification
- Add subcategories for specific activities
- Set up detection rules for automatic categorization
Step 6: Creating Your First Detection Rule
Detection rules automatically categorize your time based on applications and window titles. Here's how to create your first rule:
11From Recent Activity
Right-click on any session in your Dashboard or Time History to create a rule:
- Select "Create Detection Rule" from the context menu
- Choose the appropriate category and subcategory
- Add keywords to match specific window titles
- Give your rule a descriptive name
12Test Your Rule
After creating a rule:
- Use the application that should trigger the rule
- Check if it's automatically categorized correctly
- Adjust keywords or categories if needed
- Use "Re-categorize" to apply rules to existing history
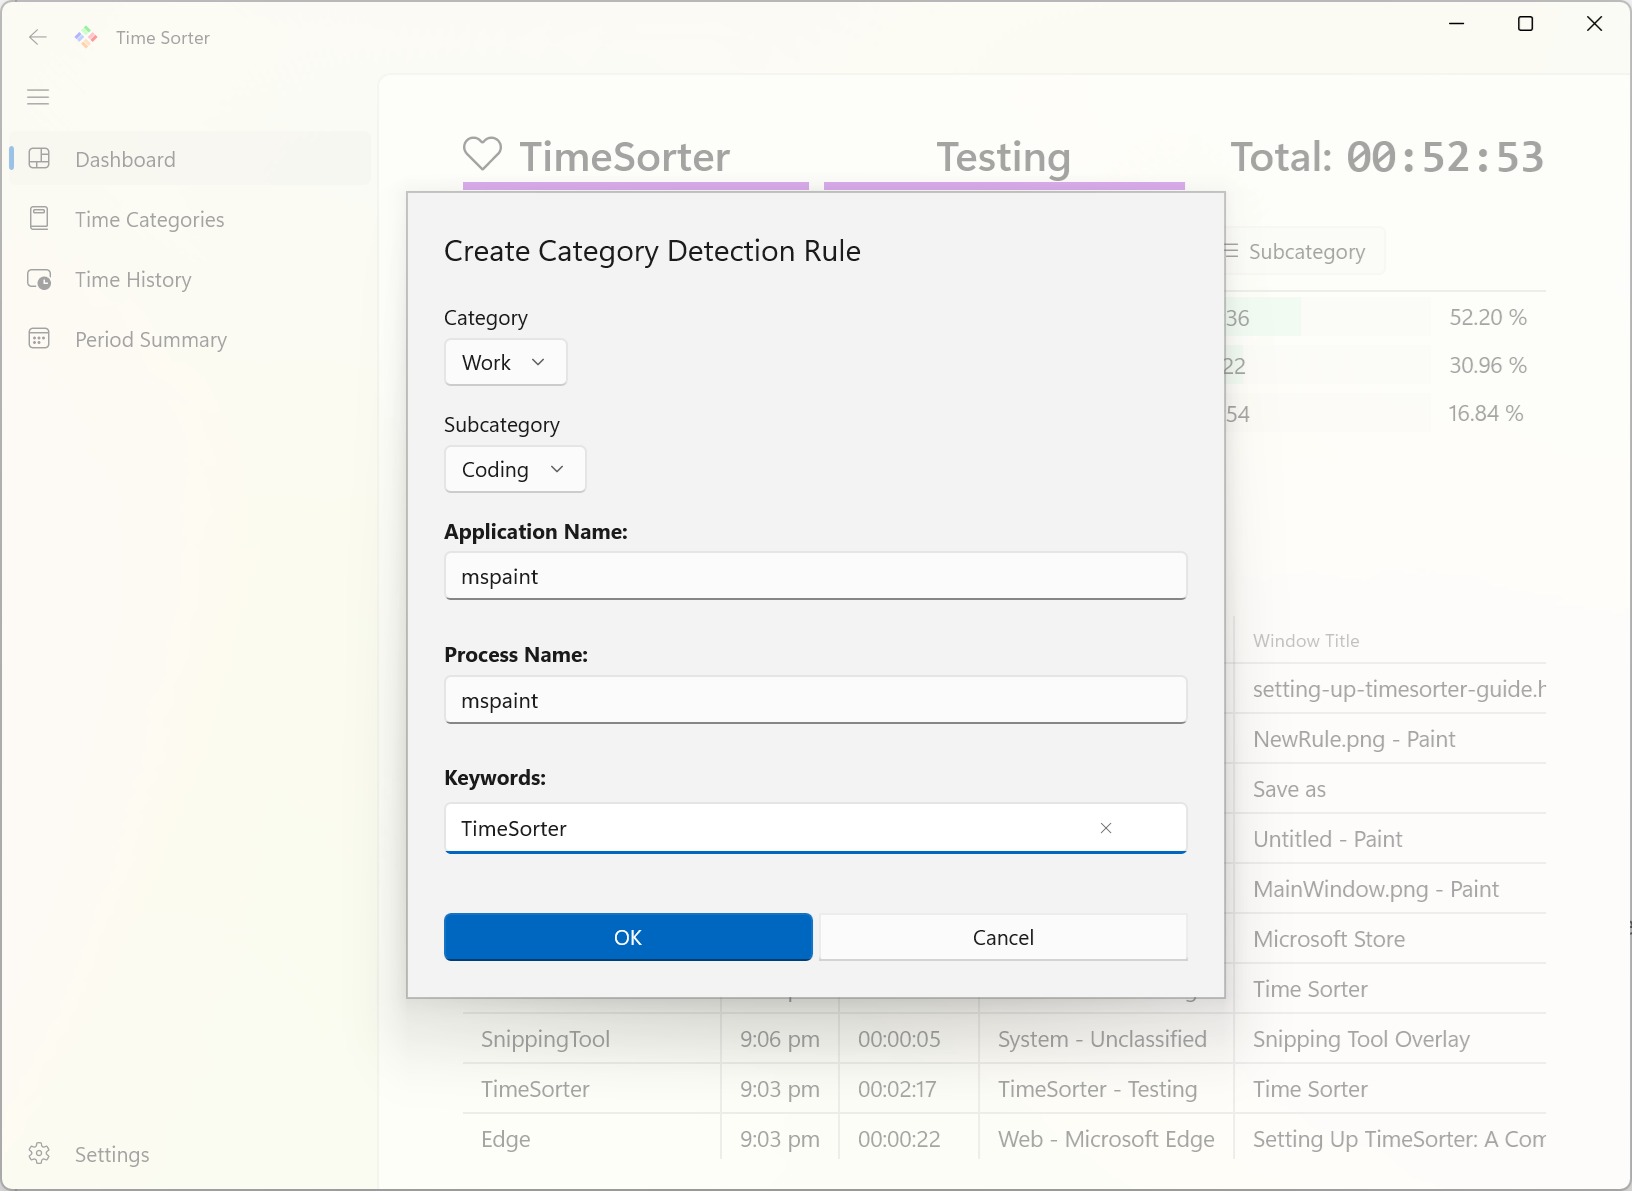
Creating a detection rule dialog with category selection and keyword input
Step 7: Exploring Analytics and Reports
Period Summary
Access detailed analytics through the "Period Summary" section:
- Choose different time periods (Today, This Week, This Month, etc.)
- View time distribution across categories
- Analyze productivity patterns and trends
- Export data for further analysis
Time History
Review detailed session history:
- Chronological list of all activities
- Filter by date ranges and categories
- Right-click actions for rule creation
- Session editing and management
Pro Tip: Pay attention to "System-Unclassified" items in your history. These are sessions that haven't been automatically categorized, so you may need to add detection rules for them. You can re-assign categories to all items in your history at any time using the "Re-categorize" command in the "Time Categories" page.
Step 8: Privacy and Data Management
Understanding Local Storage
TimeSorter stores all data locally on your computer:
- Database Location:
%AppData%\TimeSorter\TimeSorter.db - No Cloud Sync: All data stays on your device
- Complete Privacy: No data transmitted to external servers
- Backup Options: Copy the database file for backup
Data Backup and Transfer
To backup or transfer your TimeSorter data:
- Close TimeSorter completely using context menu on tray icon
- Navigate to
%AppData%\TimeSorter\ - Copy the
TimeSorter.dbfile - Store it safely or transfer to another computer
Ready to Start Tracking Your Productivity?
TimeSorter is now set up and ready to help you understand your time usage patterns. Start with the default settings and customize as you learn more about your productivity habits.
Download TimeSorter NowTroubleshooting Common Setup Issues
TimeSorter Won't Start
- Ensure you have Windows 10 or Windows 11
- Check if Windows Defender is blocking the app
- Verify that you enabled auto start in application settings
- Reinstall from Microsoft Store if needed
Categories Not Working
- Use "Re-categorize" after creating new rules
- Check rule order (first match wins)
- Verify keywords match window titles exactly
- Test rules with actual application usage
Next Steps
Now that you have TimeSorter set up and running, you're ready to start tracking your productivity patterns. As you use the application, you'll discover insights about your work habits and find opportunities to optimize your time usage.
For more detailed information about TimeSorter features, check out our complete user manual or explore our blog for productivity tips and advanced usage techniques.
We'd love to hear about your experience with TimeSorter. If you have suggestions for improvements or want to share how the app has helped your productivity, please drop us a message. Your feedback helps us make TimeSorter even better for all users.